
TL;DR BOX
A DEX swap is a direct trade from your wallet through a liquidity pool, not an order book. You choose an input token, an output token, confirm in your wallet, and the swap executes on-chain. The key things that matter are using the correct network, the official DEX site, having enough gas (BNB or ETH), and understanding slippage and price impact.
Most beginner mistakes come from rushing: wrong links, no gas, ignoring approvals, or not checking the transaction hash. Approvals are normal for token-to-token swaps, but they should be treated carefully and revoked when no longer needed. Checking the transaction on a block explorer builds confidence and removes guesswork.
Key points
Fact: DEX swaps happen through liquidity pools, not buyers and sellers.
Mistake: Swapping without checking gas, slippage, or approvals.
Action: Start with simple, liquid pairs and always verify the transaction on-chain.
Critical insight
A calm, boring first swap is a win, it means you’re using crypto correctly, not gambling.
Table of Contents
Before we dive in, take this Crypto and Blockchain Cheat sheet - a quick, printable snap shot you can keep open while you read!

Lesson 9: Crypto Wallet and How DEX Swaps Work
In previous lessons, we’ve discussed what is crypto wallet and security, how to research token pages, what is tokenomics, and how to avoid scams. Now I would like you to understand one ultimate skill in a controlled, low-risk way:
How a real DEX swap works end to end from your wallet.
1) What you’re actually doing when you “swap” on a DEX
A DEX swap is not like a CEX order book.
On a decentralized exchange, you trade through a liquidity pool (explained in Lesson 2)
Simple example (coin + coin):
If you swap ETH → BTC $BTC ( ▲ 2.91% ), the pool calculates the rate and you receive BTC equivalent (minus fees).

Token reality (coin + token):
Most beginner swaps look like this:
BNB $BNB ( ▲ 1.09% ) → USDT $USDT ( ▲ 0.01% ) on BNB Chain
ETH $ETH ( ▲ 3.01% ) → USDC $USDC ( ▼ 0.0% ) on Ethereum/Base
BNB → CAKE on PancakeSwap
ETH → UNI on Uniswap
PancakeSwap itself describes swaps as trading one token for another through automated liquidity pools (and in some cases market makers depending on chain/route).
Uniswap explains swaps similarly: you pick input token + output token, enter an amount, and execute.
2) Before you connect your wallet: Here is my 60-second safety setup
This is where most beginners mess up not because DEXs are hard, but because they click the wrong link.
Step 1: Turn on wallet security alerts
MetaMask has security alerts built in partnership with Blockaid, designed to warn you about risky transactions.
(If you’re using MetaMask, I consider this a must-have safety layer.)

Source: Metamask
Step 2: Add one extra “signing protection” tool (optional but powerful)
You have a few beginner-friendly options:
Scam Sniffer (browser extension): alerts you when it detects phishing links and malicious sites; it’s built specifically for Web3 browsing risks.

Pocket Universe (browser extension): shows what you’re signing and warns on suspicious transactions before you confirm.

Rabby Wallet (wallet alternative): includes transaction simulation and a risk scanner that can warn/disable signing until you acknowledge risk.

If you’re a total beginner, MetaMask + security alerts is already good. Adding one of these is like adding an extra lock on your door.
Step 3: Know your “gas coin”
On BNB Chain, you need BNB to pay network fees.
On Ethereum, you need ETH to pay network fees.
If you don’t have that gas coin, swaps fail. (This is the #1 beginner error.)

Source: Binance
3) The DEX swap walkthrough: PancakeSwap (BNB Chain)
PancakeSwap’s docs literally outline the beginner flow: go to the exchange page, connect your wallet, then trade.
3.1 Open PancakeSwap safely
Use the official domain that I reference: pancakeswap.finance
When the page loads, I look for:
The lock icon in the browser
The URL spelled perfectly (no extra letters)
3.2 Connect your wallet
Click Connect Wallet → choose MetaMask (or another wallet).

Your wallet will ask permission to connect. This is not spending money. It’s just “let this website see my wallet address.”

3.3 Choose a simple first swap
Example: BNB → USDT or BNB → CAKE

Why I like these:
They’re common, liquid, and easy to understand.
USDT and CAKE are tokens learners will see constantly.
3.4 Understand the numbers you see before you swap
When you enter an amount, you’ll see things like:

“Price impact” (important)
If liquidity is low, your swap pushes the price against you. PancakeSwap warns that swaps can be difficult/expensive/impossible if liquidity is low.
How I explain it:
If you’re trying to buy into a tiny market, you become the market.
“Slippage” (the beginner trap)

Source: Investopedia
Simple explanation:
Slippage is your “tolerance” for small price movement between clicking Swap and the transaction confirming.

Source: Crypto News
Too low → transaction may fail
Too high → you risk getting a worse fill (and on sketchy tokens, it can be dangerous)
For big tokens (USDT, CAKE) slippage is usually small. For meme tokens, slippage can be wild, which is exactly why I don’t like to start there.
3.5 Click Swap → Confirm in wallet
When you click Swap, MetaMask shows:
Network fee (gas)
Total cost
What you’re signing
MetaMask security alerts can warn you if something looks suspicious.
After you confirm, you’ll get a transaction hash.
3.6 Check your transaction (this is how you build confidence)

I always do this because it removes doubt.
Click the transaction hash and open it in a block explorer (BscScan for BNB Chain).
You should see status: Success
You should see which token went out and which token came in.
3.7 “My token isn’t showing in the wallet”
This happens all the time. It doesn’t mean you lost money.
Sometimes you need to import the token so the wallet displays it. If it’s not shown, you can import the token by contract address to see it.

That’s why I prefer swapping into well-known tokens first, wallets often auto-detect them.

This is the concept that makes DEXs feel confusing at first.
If you swap from BNB/ETH (native coin) into a token, you usually don’t need an approval step.
But if you swap one token (like USDT) into another (like CAKE), the DEX needs permission to spend your USDT.
That permission is called a token approval.
Revoke.cash explains it clearly: approvals let a smart contract spend your tokens on your behalf via an approve() function specifying spender + amount.

Why approvals matter (real beginner explanation)
If you approve “unlimited USDT spending” to a malicious contract, that contract can potentially drain those tokens later.
So I keep approvals clean:
Approve only what I need when possible.
Revoke approvals I don’t use anymore using revoke.cash.
The tool I use for this: Revoke.cash
Revoke.cash lets you connect, inspect approvals, and revoke ones you don’t need.
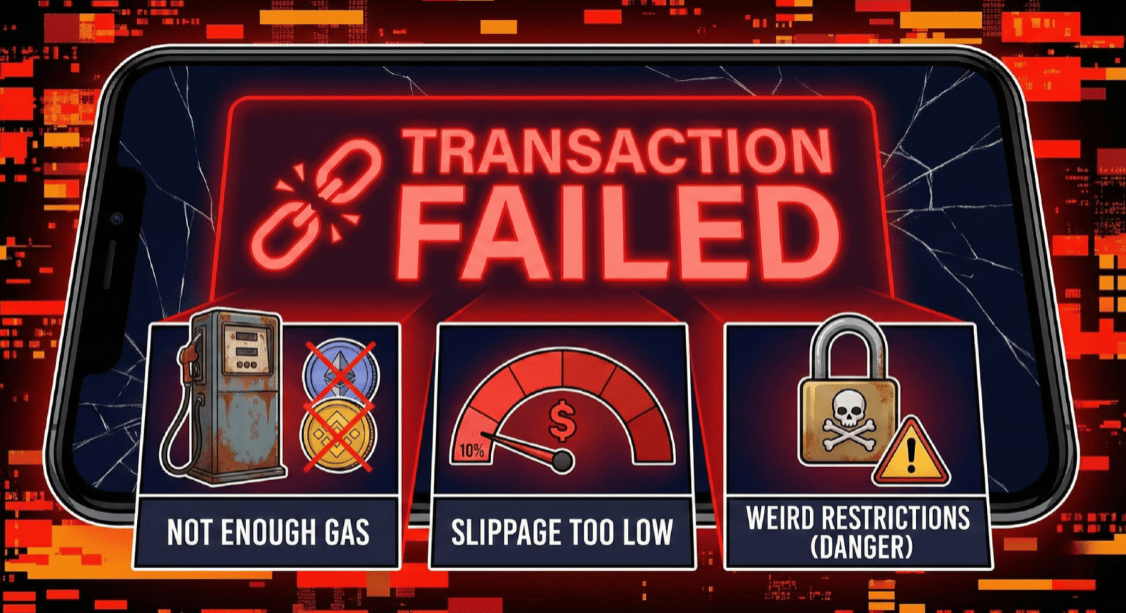
5) Common beginner problems
“Transaction failed”
Usually:
Not enough gas coin (BNB/ETH)
Slippage too low
Token has weird restrictions (danger sign)

“My token disappeared / I can’t see it”
Often:
Wallet isn’t displaying it yet
You need to import token contract address (like the WBNB example in the course)
“It asked me to approve before swapping”
Normal for token-to-token swaps. Approvals are a standard DeFi pattern.
But I treat unlimited approvals with respect and revoke later.
My final takeaway for Lesson 9
The first DEX swap is the moment a learner stops “watching crypto” and starts using crypto.
And I want it to feel boring in the best possible way:
Correct network
Official domain
Clear swap
Readable wallet confirmation
Verified transaction hash
Approvals understood and cleaned up
Once you can do that calmly, you’re ready for the next level of the course where we start connecting these skills to the launch pipeline (PinkSale, liquidity, DEX listing, visibility) in a way that’s structured and not chaotic. Good luck swapping! 🤞
A gift for you: CustomGPT
CustomGPT trained with every lesson from this course, hope you enjoy using it! ❤️🔥
If you enjoy this lesson, please let me know and check out these amazing news, content, experiences and tutorials related to AI and Crypto from our team down below🔥✌️👇️: