Table of Contents
🎈 How Liquidity Works and Why Stop Hunts Happen
What is liquidity?
Every time someone places a buy or sell order, that order becomes liquidity at that price. It could be retail traders, banks, market makers, etc.

So each level holds pending orders, which means liquidity is always present but some levels attract far more of it than others.

Think about a clean support where price bounced two or three times. Many traders see that level as “safe.”
They buy there. They stack long positions. And they place their stop losses right under the level.

But price slides down. It dips under the stop-loss before it shoots back up. That dip is not random, that dip is called a stop hunt.
A stop hunt is where big players want to fill large positions. They need liquidity but retail stops give them that liquidity so they push price into the zone where retail traders place stop-loss.
This creates a liquidity sweep.
All the stops trigger. Those orders feed the bigger players. Once they get the fills they want, the market reverses.
Note: liquidity sweeps work best on the 5m and 15m chart, and it can be used on any assets such as forex, crypto, stock.
💸 The Basic Liquidity Strategy. Four Steps You Must Follow
To simplify everything, I will break down the liquidity strategy into 4 main steps:
Step 1. Identify a Break of Structure
Break of structure shows you the direction of the market.
In an uptrend you want higher highs and higher lows. When price closes above the previous high, that is your break of structure.

In a downtrend you want lower highs and lower lows. Price must close below the previous low. That close is the break of structure that confirms sellers are driving the move.
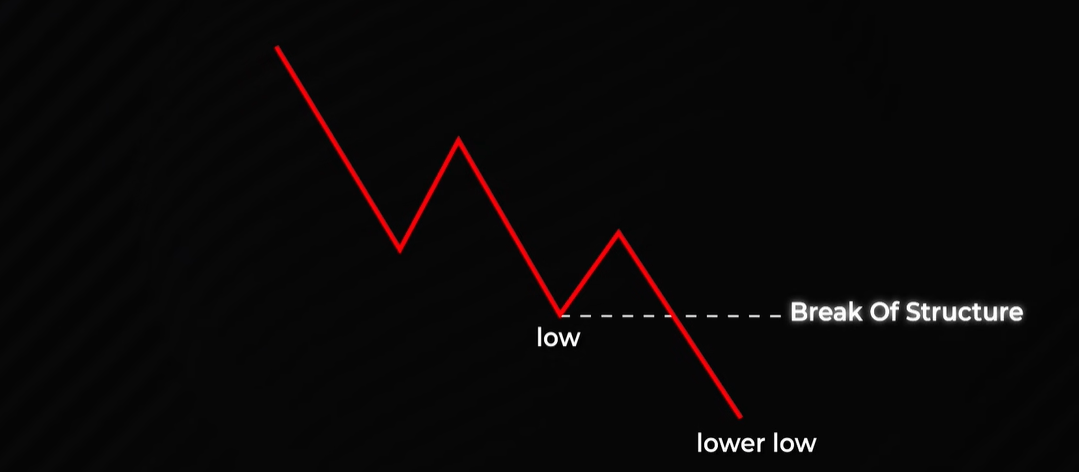
You need this before anything else. Without a clean break of structure you cannot trust the next move. Many traders lose because they trade without waiting for this step.
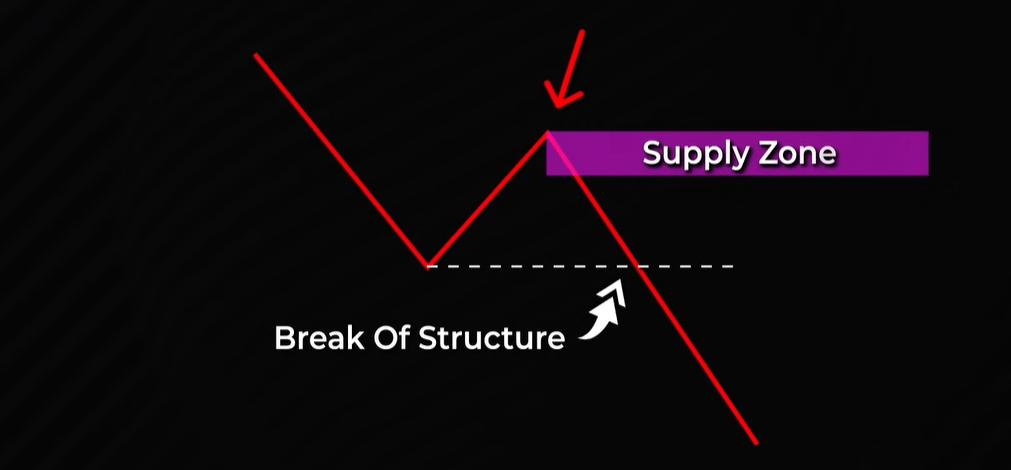
Step 2. Identify the Supply or Demand Zone
A demand zone forms when buyers previously stepped in with strong momentum. It marks the last area where big buy orders pushed price upward. When price returns to this zone, it often finds support again because those unfilled buy orders can still be sitting there.

A supply zone forms when sellers previously stepped in with strong momentum. It marks the last area where big sell orders pushed price downward. When price returns to this zone, it often meets resistance again because remaining sell orders can still be waiting there.
Step 3. Find the Liquidity Level
This is the most important part.
Liquidity level is a place full of stops-loss orders sitting.
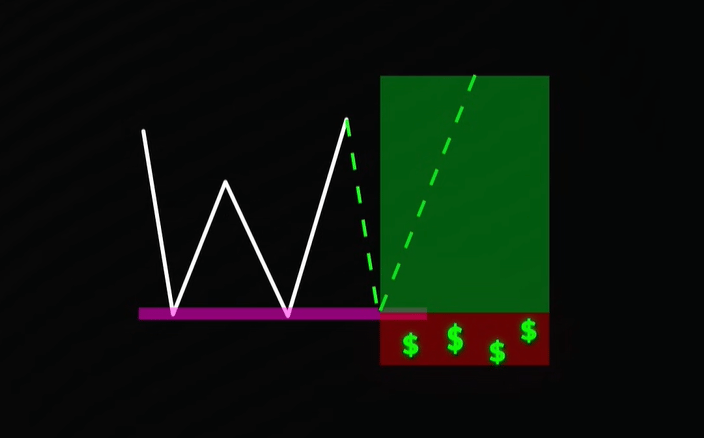
These stops create the liquidity the market will hunt. Signature patterns of liquidity levels are: double bottoms, triple bottoms, double tops.

Levels that got rejected two or three times. These are perfect targets.
For a long, you want the liquidity level above the demand zone. Price will sweep the lows under that level. That liquidity sweep fuels the move back into demand.
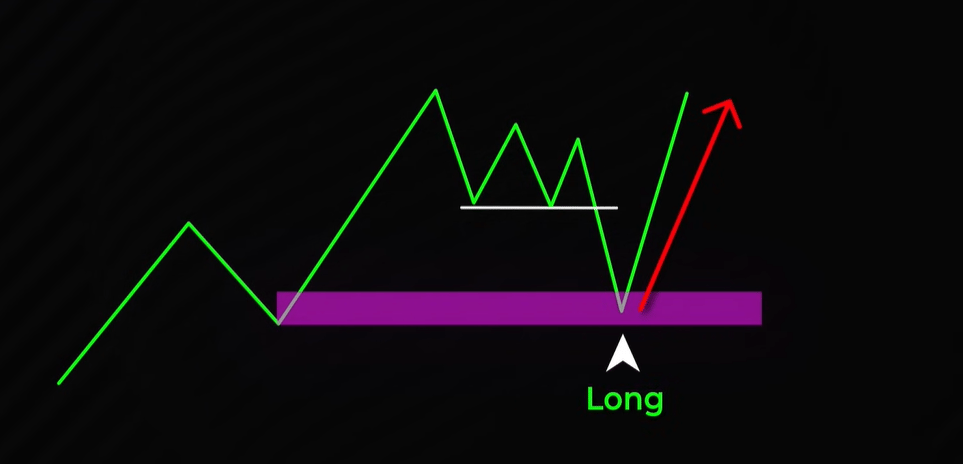
For a short, you want the liquidity level below the supply zone. Price sweeps the highs above that level. That liquidity sweep sends price down into supply.

If you ever struggle to find entries, it is usually because you skip this part. Liquidity level is the trap. The sweep tells you when the trap is triggered. And when you match that with break of structure, the move makes sense.
Step 4. Enter the Trade
You do not chase candles. You place a limit order. For a long, put the limit at the top of the demand zone. For a short, put the limit at the bottom of the supply zone. Price sweeps the liquidity. Price hits your zone. The entry triggers. You do not guess. You wait.

Your stop loss goes just beyond the zone. Keep it tight but safe. Your take profit can target two times your risk or the previous highs or lows. Both work.
The key is to stay consistent.

You can apply this idea in a downtrend too, just in the opposite way.
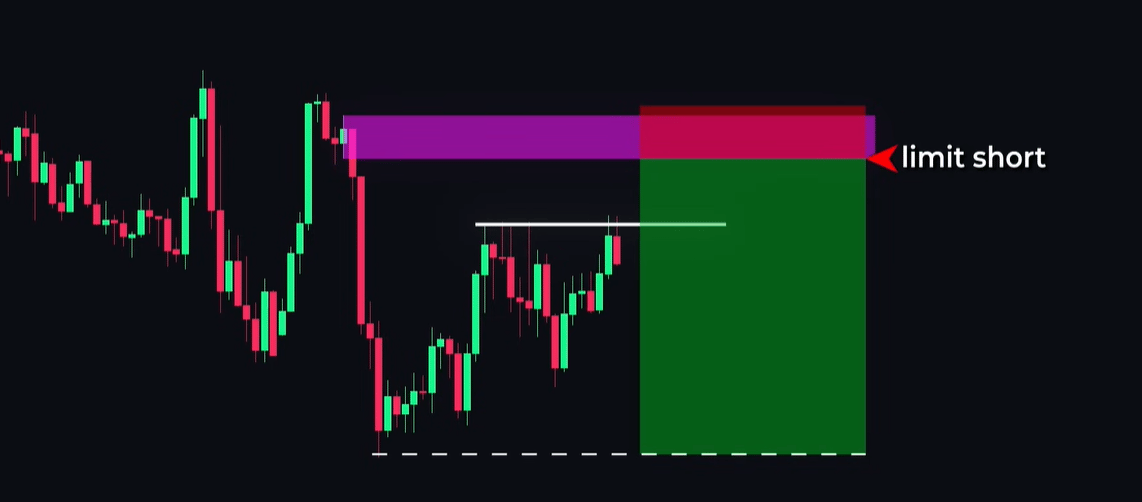
When you follow all four steps, everything feels clean. Break of structure sets the trend. The zone shows where orders live.
The liquidity sweep gives the trigger. The limit order handles the rest. This removes stress. This removes fear. And you start trading with structure instead of emotion.
🥛 The Advanced Liquidity Setup
Major vs Minor Zones
A major zone comes from a strong break of structure. This zone is usually big.
A minor zone forms from a smaller break of structure. It is weaker but it forms faster.
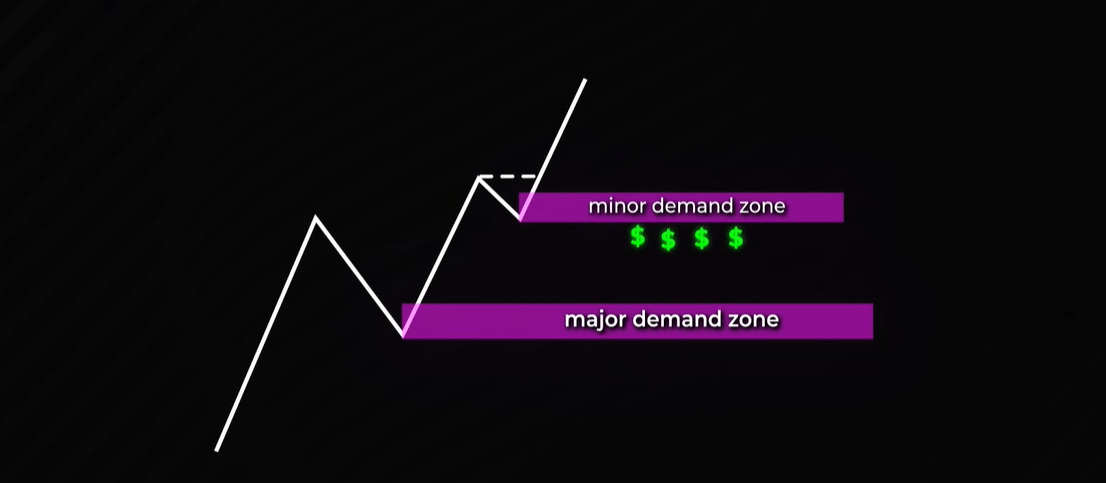
The minor zone builds stops around it. Traders think the minor zone is the real zone and they place stops under it or above it.
They expect price to go up, but that is exactly where price sweeps liquidity. The whales know where retail traders place stop-loss. The liquidity sweep clears the minor zone to reach the major zone.
That is where the large orders sit!
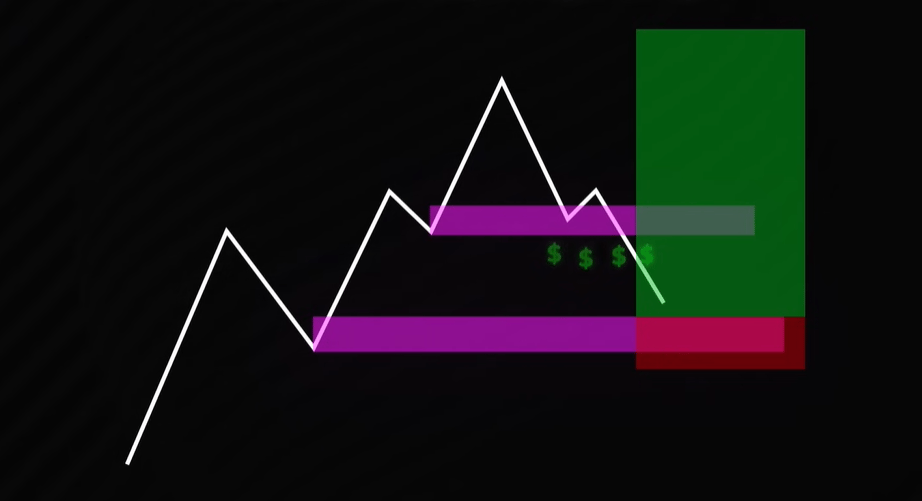
So your job is simple:
Find the major zone first, and then mark the minor zone as the liquidity level.
When price sweeps that minor zone, don’t be FOMO and keep calm to wait for price reaching the major zone → Here is where you get the entry.
This is how we avoid entering too early.
Advanced Long Setup
For a long, you need an uptrend confirmed by a break of structure.
You then mark the major demand zone that caused the move. After that you watch for a smaller break of structure above that major zone.

The minor zone becomes your liquidity level. Price will often push down into the minor zone first. It sweeps the lows under that minor zone, before price continues down into the major demand zone.

Your limit buy sits at the top of the major zone, not the minor one.
You put your stop below the major zone. You target the previous highs or two times the risk.
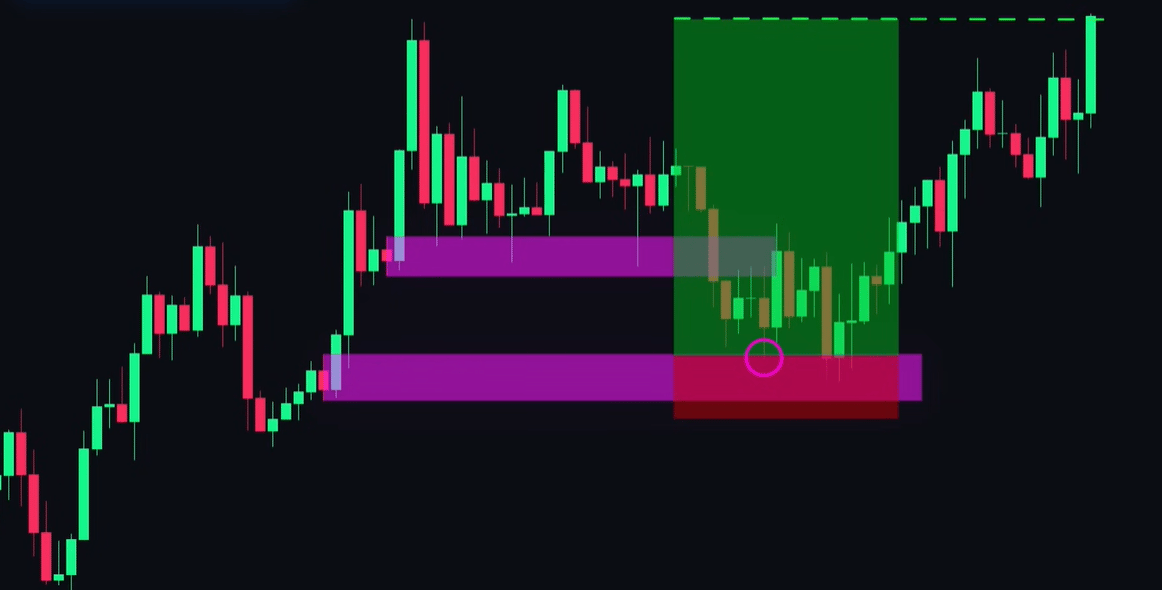
This is the kind of trade that cuts out noise and fake signals.
Bitcoin $BTC.X ( ▲ 1.42% ) is showing the same pattern right now:
We thought $100,000 was a strong support and price would bounce at that high-liquidity level. But it's only a minor zone, and it’s the trap set by market makers.
So I expect BTC to drop back to around $84,500–$85,000, then bounce hard. For me, BTC is still heading to $240,000 this cycle and big corrections are part of a strong rally.
Advanced Short Setup
For a short, the idea is quite similar.
You want a downtrend confirmed by a break of structure. You will mark the major supply zone that caused the drop.
After that you look for a smaller break of structure below that major zone. That small move forms a minor supply zone.
Of course, the minor zone sits below the major zone in the downtrend.
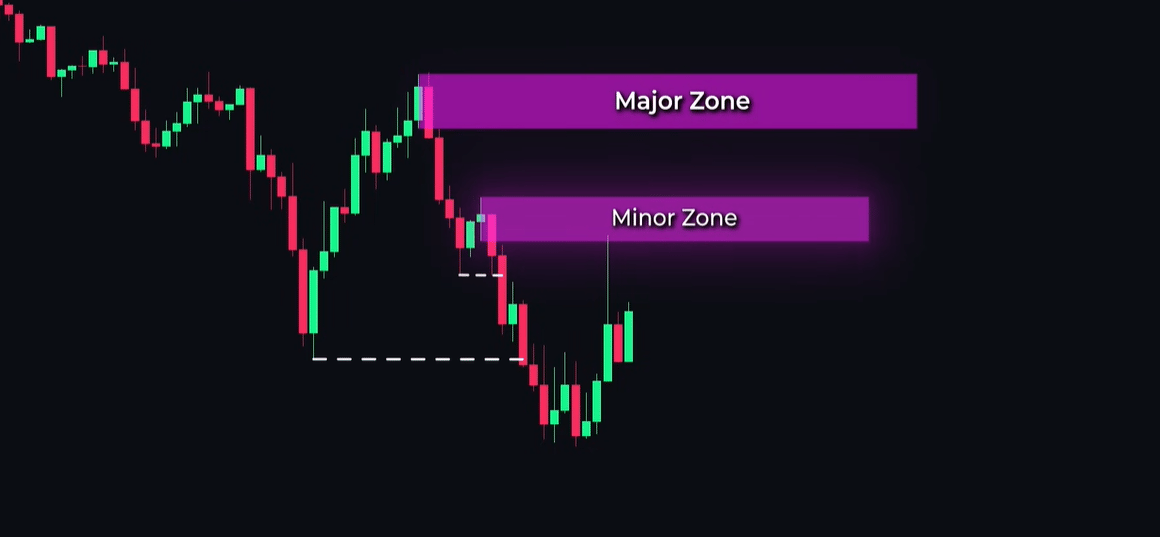
The minor zone becomes your liquidity level.
Price pushes up, it sweeps the highs above the minor zone to clear the stop-loss. After that sweep, price taps into the major supply zone.
That is where your short begins.

Once again, your limit sell sits at the bottom of the major zone.
Your stop-loss goes just above it, and your take profit goes at previous lows or two times the risk.
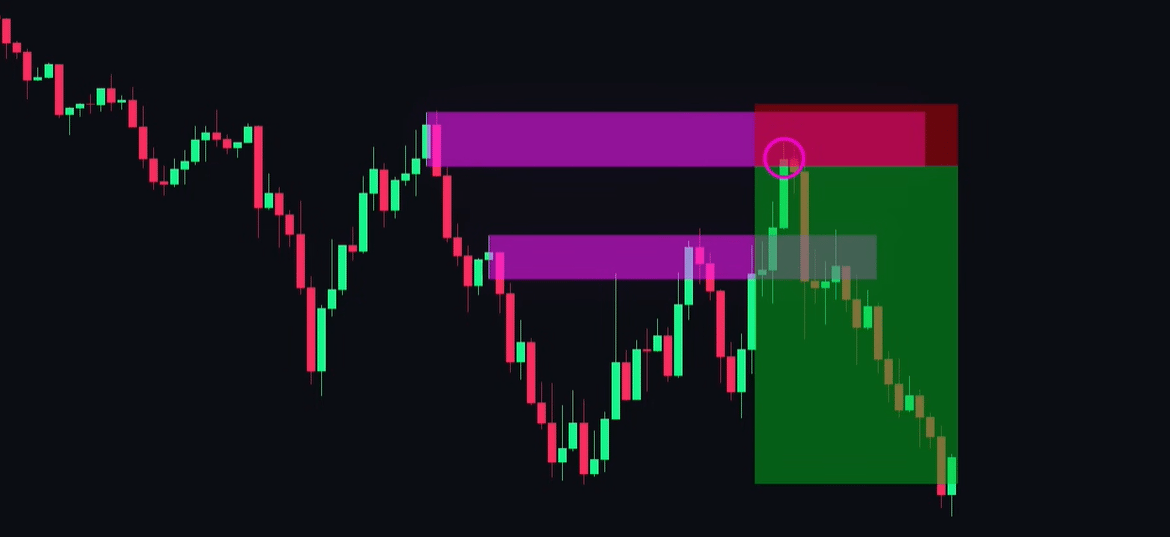
Minor zones trick traders and many try to short there. They place stops above it
Hence, the price sweeps those stops and then it becomes whales’ entry signal at the major zone.
Advanced Entry Logic
Your limit order always sits at the major zone. Not the minor one. The minor zone is only the liquidity level. It is not the entry. You keep your stop outside the major zone. You keep your take profit wide enough to catch the larger move. And you keep your eyes on the break of structure that started everything.
⚡ Key Takeaway
A liquidity sweep happens when price spikes into stop-loss clusters. This gives bigger players the liquidity they need and often leads to a sharp reversal right after the sweep.
A clean break of structure is your anchor. It confirms the trend direction and helps you understand whether the next liquidity sweep will likely fuel a long setup or a short setup.
Demand zones and supply zones show where strong orders entered before. After a liquidity sweep, price often returns to these zones because unfilled buy or sell orders may still be sitting there.
The advanced setup uses a minor zone as the liquidity level. When the liquidity sweep clears that minor zone, price usually moves toward the major zone where the real entry forms after a confirmed break of structure.
The strongest trades come from patience. You wait for break of structure. You wait for the liquidity sweep. And you enter only at the major zone. This removes noise and keeps your trades controlled.
If you’re interested in other topics and want to stay ahead of how Crypto are reshaping the markets, from whale strategies to the next major altcoin narrative, you can explore more of our deep-dive articles here:
*indicates premium insights available to Pro readers only.
